Proper concrete care requires the right tools and techniques to maximize lifespan and prevent costly repairs. Homeowners should use microfiber mops for daily maintenance, pH-neutral cleaners to avoid surface etching, and automatic scrubbers for thorough cleaning. Sealing concrete after the 28-day curing period creates a protective barrier against water damage and chemical corrosion. Regular inspections, proper drainage management, and seasonal maintenance checks ensure surfaces remain structurally sound. This comprehensive approach reveals essential strategies for long-term concrete preservation.
While maintaining beautiful concrete surfaces may seem daunting, homeowners can achieve professional-quality results by selecting the right tools and mastering proven cleaning techniques. Effective concrete care begins with proper tool selection, including microfiber dust mops for daily maintenance and automatic floor scrubbers equipped with soft, non-abrasive pads for comprehensive cleaning. pH-neutral cleaners specifically formulated for concrete prevent surface etching while maintaining shine.
Daily Maintenance Tools:
Deep Cleaning Equipment:
For Indoor Concrete Floors:
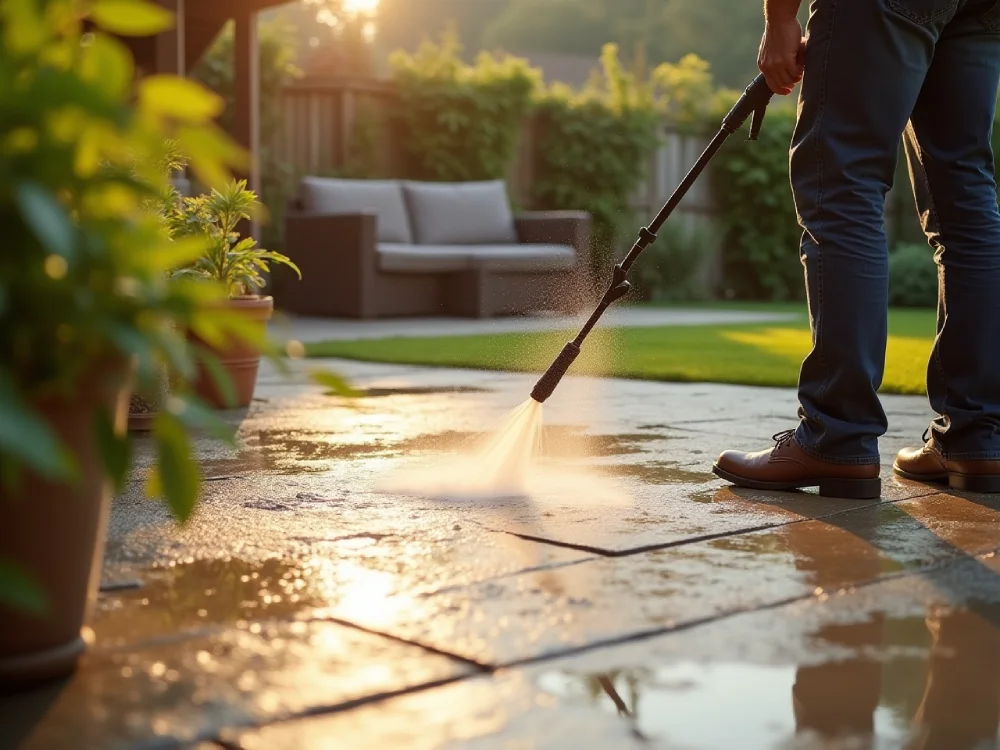
For Outdoor Concrete Surfaces:
For thorough stain removal, homeowners should start with the gentlest method and escalate only as needed. Pressure washers with high PSI ratings tackle stubborn grime effectively on driveways and walkways, while burnishers restore surface shine on interior floors without requiring expensive polishing machines.
Concrete sealing serves as a critical protective measure that significantly extends the lifespan and maintains the appearance of concrete surfaces throughout a home's exterior and interior spaces. Water damage represents one of the most destructive forces affecting concrete, as moisture penetration leads to freeze-thaw cycles, chemical corrosion, and structural deterioration that can cost thousands in repairs. New concrete installations require sealing after the 28-day curing period to ensure optimal protection and performance. Selecting the appropriate sealer type requires understanding the specific needs of each concrete surface, whether it involves penetrating sealers for driveways or film-forming options for decorative patios.
Most homeowners underestimate the critical role that proper sealing plays in protecting their concrete surfaces from costly water damage. Concrete's porous nature allows water infiltration, leading to structural damage, cracking, and spalling over time. When moisture penetrates and freezes, it expands within the concrete, creating additional cracks that compromise structural integrity.
How Water Damages Unprotected Concrete:
Effective sealing prevents water absorption and protects embedded steel reinforcement from corrosion caused by chloride penetration. Essential waterproofing precautions include sealing basements, foundations, and exposed outdoor surfaces where water exposure is common. Proper sealing also prevents mold growth and surface degradation, particularly in freeze-thaw cycles. By creating a protective barrier, homeowners can significantly extend their concrete's lifespan and avoid expensive repairs.
Sealing concrete provides easy cleanup of spills without permanent damage to the surface—a particularly valuable benefit for garage floors, driveways, and outdoor entertaining areas.
Selecting the right sealer requires understanding the distinct categories and performance characteristics of available products. Penetrating sealers, including silane and siloxane types, chemically bond within concrete pores while maintaining natural appearance, making them ideal for homeowners prioritizing authentic aesthetics. Film-forming sealers like acrylics and polyurethanes create protective surface layers that enhance durability but may affect the finished look.
| Sealer Type | Best For | Lifespan | Appearance |
| Penetrating (Silane/Siloxane) | Driveways, walkways, exposed aggregate | 5-10 years | Natural, matte finish |
| Acrylic Film-Forming | Decorative concrete, stamped patios | 1-3 years | Glossy or satin sheen |
| Polyurethane | High-traffic areas, garage floors | 5-10 years | High-gloss finish |
| Epoxy | Industrial floors, heavy-duty garages | 5-15 years | Very high-gloss |
| Densifiers | Polished concrete, commercial spaces | Permanent | No change to appearance |
Water-based formulations offer significant environmental advantages, containing lower VOCs and easier application compared to solvent-based alternatives. Densifiers permanently strengthen concrete surfaces without altering appearance, while specialized sealers provide freeze-thaw resistance for harsh climates.
Consider factors like desired finish, maintenance requirements, and local environmental regulations when choosing. Penetrating sealers deliver long-lasting protection through chemical bonding, while film-forming options require periodic reapplication but offer superior chemical resistance. When planning future maintenance, ensure sealer compatibility to prevent application failures and costly removal procedures.
In North Texas, where we experience intense summer heat, occasional freezes, and expansive clay soils, choosing the right sealer for your specific application is essential for long-term performance.
Five distinct curing methods can transform freshly poured concrete from a vulnerable mixture into a durable, long-lasting foundation that withstands decades of use. Water curing maintains surface moisture through ponding or sprinklers, while wet covering employs saturated materials like burlap to prevent evaporation. Membrane curing applies protective compounds that form moisture-retaining films, and sheet curing deploys plastic covers to seal in hydration-critical water.
| Method | Duration | Best Application | Key Advantage |
| Water Curing | 7+ days | Flat surfaces, pavements | Most effective hydration |
| Wet Covering | 7+ days | Vertical surfaces | Continuous moisture |
| Membrane Curing | Applied once | Large areas | Labor-efficient |
| Sheet Curing | 7+ days | Small projects | Easy for DIY |
| Formwork Curing | Until removal | Structural elements | Natural moisture retention |
Proper curing is the most critical factor in achieving concrete's full strength potential. Concrete doesn't "dry"—it cures through a chemical reaction called hydration that requires adequate moisture and temperature. Without proper curing:
Temperature monitoring and cold weather precautions prevent freezing damage during curing. Proper moisture control activates essential hydration reactions, ensuring maximum strength development and preventing costly cracks. In hot, dry climates like North Texas, preventing rapid moisture loss through evaporation is particularly critical during the curing process.
The foundation of concrete longevity lies in consistent preventive maintenance that addresses potential problems before they escalate into costly repairs. Homeowners should conduct regular inspections, examining surfaces for cracks, discoloration, or early signs of deterioration. Prompt attention to small issues prevents water infiltration and structural damage.
Monthly Tasks:
Quarterly Tasks:
Annual Tasks:
Every 2-5 Years:
Effective maintenance requires managing water flow around concrete structures. Properly functioning gutters, downspout extensions, and optimal soil drainage protect against settlement and cracking. Landscaping should direct water away from concrete surfaces, while vegetation control prevents root intrusion and pest burrowing.
Applying quality sealers blocks moisture penetration and chemical damage. Regular cleaning removes debris that causes staining and surface erosion. Seasonal maintenance checks ensure protective treatments remain effective, preserving both appearance and structural integrity for years.
Four distinct seasons bring unique challenges and opportunities for concrete maintenance, making weather-aware care essential for preserving surfaces throughout the year. Spring inspections reveal winter damage from freeze-thaw cycles, requiring prompt crack repairs and thorough cleaning to remove harmful salt residue. Summer protection focuses on UV-resistant sealers that prevent fading and moisture infiltration. Fall preparation involves clearing debris and applying protective coatings before winter arrives.
Spring (March-May):
Summer (June-August):
Fall (September-November):
Winter (December-February):
Effective winterization techniques include using calcium-magnesium acetate instead of rock salt and plastic shovels for snow removal. These simple switches can dramatically extend the life of your concrete and prevent the scaling and spalling that rock salt causes.
Reference: National Ready Mixed Concrete Association
When concrete cracks appear, swift action prevents minor surface damage from becoming costly structural problems that threaten the integrity of driveways, sidewalks, and foundations. Detailed crack classification guides homeowners toward optimal material selection for lasting repairs.
| Crack Width | Recommended Solution | Application Method |
| Less than 1/4 inch | Flexible sealants or self-leveling compounds | Pour or inject into cleaned crack |
| Greater than 1/4 inch | Backer rod plus urethane sealant | Insert backer rod, top with sealant |
| Structural cracks | Professional epoxy injection | Requires specialized equipment |
| Active (moving) cracks | Urethane sealants for flexibility | Apply in expansion-contraction cycle |
| Fine hairline cracks | Low-viscosity polymer resins | Brush or spray application |
Preparation (Critical for Success):
Repair Application:
Proper preparation requires thorough cleaning with wire brushes, pressure washing, and complete drying for 24 hours. Address underlying causes like poor drainage or soil settlement before repairs. Regular joint maintenance and periodic inspections prevent future crack formation, protecting concrete investments through proactive care.
Important: Structural cracks (wider than 1/4 inch, running through entire slab depth, or showing vertical displacement) require professional evaluation. These may indicate serious foundation issues that DIY repairs cannot adequately address.
Why do well-intentioned homeowners often find themselves facing expensive concrete repairs despite their best maintenance efforts? The answer typically lies in fundamental mistakes that compromise concrete's structural integrity from the start.
Most concrete failures stem from preventable errors during installation and maintenance. Improper mixing creates weak foundations, while inadequate preparation ensures repairs won't last. Understanding these pitfalls helps homeowners protect their investments and avoid costly replacements.
Installation and Curing Errors:
Maintenance and Cleaning Mistakes:
Water Management Failures:
Sealing and Repair Mistakes:
Recognizing these common errors enables homeowners to make informed decisions about concrete care and maintenance. When in doubt, consulting with experienced concrete professionals can save thousands in future repair costs.
Proper concrete care requires consistent attention, quality tools, and proven techniques. Homeowners who implement regular sealing, follow correct curing procedures, and address minor issues promptly will enjoy durable, attractive concrete surfaces for decades. Understanding seasonal maintenance needs and avoiding common mistakes prevents costly repairs while preserving property value.
By following these comprehensive guidelines, you can confidently maintain your concrete investments and safeguard long-term structural integrity throughout changing weather conditions. Remember: an ounce of prevention is worth a pound of cure when it comes to concrete maintenance.
Need help with concrete sealing, repair, or maintenance? Contact TriStar Built today for expert guidance. Serving Denton County and North Texas since 2006, we work with trusted concrete professionals who understand local climate challenges and can help you protect your concrete investment for years to come. Let's keep your concrete looking great and performing even better.
Most residential driveways and patios should be resealed every 2–3 years, depending on traffic levels, weather exposure, and the concrete sealer type. Penetrating sealers can last longer, while film-forming options may need reapplication sooner. Regularly sealing your concrete protects against wear and tear, UV damage, and moisture, helping to maintain your investment. A well-maintained surface also boosts your home’s curb appeal by keeping concrete looking its best. In regions like North Texas, following these maintenance tips is especially important due to harsh climate conditions.
No. Regular cleaners such as vinegar, bleach, or ammonia can harm the surface of your concrete by breaking down sealers and causing discoloration. For proper care of concrete, always use pH-neutral products specifically formulated for concrete areas. For stubborn messes, concrete cleaning services or concrete-specific stain removers work best. Following a care guide or complete guide for cleaning ensures you avoid cracks and erosion while keeping your concrete surfaces in top condition.
For fresh spills, start with a garden hose rinse and absorb the oil using kitty litter or sawdust. For set-in stains, apply a degreaser or baking soda paste and scrub with a stiff brush. For stubborn stains, professional maintenance may include specialized removers or poultices. Prevention is the best concrete strategy—applying a concrete sealer to garage floors creates a barrier that resists stains and simplifies cleanup. Whether it’s for commercial concrete or residential driveways, sealers extend lifespan and preserve aesthetic appeal.
Hairline cracks from shrinkage are normal, but larger cracks or those with uneven displacement may signal structural concerns. Look for warning signs like stair-step cracking or widening fissures in load-bearing slabs. While some may just require routine patching to resurface the slab, ignoring serious cracks can lead to costly repairs. A trusted contractor can provide professional maintenance recommendations and a care guide tailored to your specific situation, ensuring the stability of the structure.
It’s almost never too late to improve the condition of older concrete. Start with concrete driveway maintenance by power washing with high-pressure water, repairing cracks, and then applying sealer. A layer of concrete poured directly onto an existing one can sometimes be used to resurface and refresh the finish. Using a quick drying sealer helps restore aesthetic appeal while protecting against future wear and tear. Even decades-old surfaces benefit from routine concrete care, and sealing now will help maintain your investment well into the future.


Whether you’re remodeling a home, expanding a business, or starting from the ground up, TriStar Built is here to guide you every step of the way. With a focus on craftsmanship, communication, and results that last, we make the construction process clear, smooth, and worth every investment.

LOCATION: 2126 James Street, Denton, TX 76205
PHONE: (940) 381-2222
© 2025 TRISTAR BUILT - ALL RIGHTS RESERVED | WEB DESIGN & SEO BY: Authority Solutions®