Designing a safe and accessible parking lot requires calculating the correct number of ADA-compliant spaces, including van-accessible spots, positioning them near entrances with level access aisles, using clear signage and striping, maintaining proper slopes, and organizing traffic flow to minimize collisions while following federal and state accessibility standards.
A safe, accessible parking lot starts with the correct number of ADA-compliant spaces, including van-accessible spots, placed near accessible building entrances. Designers plan wide, level access aisles with bold striping, correct slopes, and clear crosswalks that do not cut through aisles. High-mounted, reflective signs stay visible above cars, while good lighting, traffic calming, and logical circulation reduce crashes. Experienced parking lot contractors ensure these elements meet current ADA standards.
When planning accessible parking capacity, a designer must first understand that ADA requirements are not optional guidelines, but enforceable minimums that shape the entire layout of a lot. The count starts with the total number of spaces and then applies the ADA table per federal ADA parking requirements. For lots up to 25 spaces, at least one accessible space is required.
As capacity grows, the designer follows a stepped increase: two spaces for 26-50 total, three for 51-75, and so on, up to nine spaces for 401-500 total. Beyond 500, lots require 2% of total spaces up to 1,000, then 20 plus one per 100 over 1,000. One of every six accessible spaces must be van-accessible.
| Total Parking Spaces | Minimum Accessible Spaces | Minimum Van-Accessible Spaces |
| 1 to 25 | 1 | 1 |
| 26 to 50 | 2 | 1 |
| 51 to 75 | 3 | 1 |
| 76 to 100 | 4 | 1 |
| 101 to 150 | 5 | 1 |
| 151 to 200 | 6 | 1 |
| 201 to 300 | 7 | 2 |
| 301 to 400 | 8 | 2 |
| 401 to 500 | 9 | 2 |
| 501 to 1,000 | 2% of total | 1 of every 6 accessible |
| 1,001 and over | 20 plus 1 per 100 over 1,000 | 1 of every 6 accessible |
Designing access aisles and markings starts with setting the correct aisle dimensions, so people using mobility devices or lifts have the space they need to exit vehicles safely. This includes ensuring aisles are relatively level and keeping the slope within 2% to reduce tipping risk and improve maneuvering. Once the size is correct, high-visibility pavement markings help drivers clearly see where to park, where to unload, and where they must keep clear.
Carefully planned access aisle dimensions allow people with mobility aids, walkers, and lifts to enter and exit vehicles safely, without feeling squeezed or at risk. Access aisles must connect directly to accessible pedestrian paths in accordance with U.S. Access Board guidelines, so users can move safely from their vehicles to building entrances.
| Element | Minimum Dimension | Key Purpose |
| Car Space Width | 96 inches (8 feet) | Fits vehicle and door swing clearance |
| Car Access Aisle Width | 60 inches (5 feet) | Space for transfers, wheelchairs, and walkers |
| Van Space Width | 132 inches (11 feet) or 96 inches (8 feet) | Supports side or rear lift deployment |
| Van Access Aisle Width | 60 inches (5 feet) or 96 inches (8 feet) | Extra room for ramps and lifts to operate |
| Vertical Clearance | 98 inches minimum | Allows high-roof vans to enter and maneuver |
| Maximum Slope | 1:48 (2.08%) | Prevents wheelchairs from rolling or tipping |
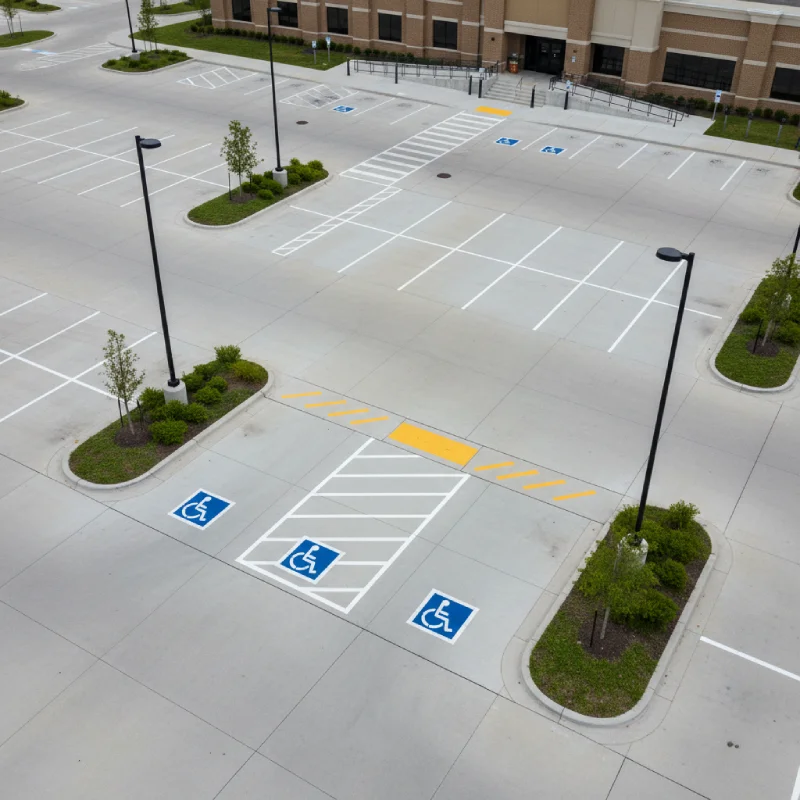
Access aisles must be impossible to miss on the pavement through a strong visual design. Designers rely on strong color contrasts, using blue backgrounds with white accessibility symbols, so drivers recognize accessible stalls at a glance. White stall lines remain the base standard, while blue can highlight accessible spaces and adjacent aisles.
An effective access aisle actively prevents drivers from treating the space as an extra parking stall or loading zone. Designers begin with proper aisle positioning, placing the aisle directly beside accessible spaces, extending its full length, and connecting it to the shortest accessible route to the entrance.
Getting signage size and placement right ensures that every driver and pedestrian can quickly understand how to use the parking lot, and it also keeps the design compliant with key codes and standards. By choosing standard sign dimensions, setting the correct mounting heights, and maintaining clear visibility from both vehicles and walkways, a designer creates a safe and easily navigable environment.
Mounting the bottom of accessible parking signs at least 60 inches above the ground keeps them above vehicle hoods, protects them from damage, and satisfies ADA rules. Designers should align signs with stall heads and driver approach angles, avoiding trees, poles, and buildings that block sightlines.
Before a single parking stripe is painted, a well-designed lot must first meet strict surface and slope requirements that protect users and preserve the pavement. Designers begin by ensuring adherence to maximum slope, holding accessible parking spaces and aisles to a gentle 1:48 grade, so wheelchairs and walkers remain stable. Curb ramps stay at or below 1:12, with adjoining routes limited to 1:20, creating smooth, predictable transitions.
Effective traffic flow in a parking lot begins with clear, predictable movement patterns that prevent confusion and reduce crash risks. Careful entrance and exit organization limits conflict points, especially where connections meet busy roads. Designers forecast traffic volumes, then test layouts to adjust lane directions and intersection controls before construction.
Safe traffic patterns within the lot work well only when the layout also protects people and vehicles from harm, day and night. Designers begin by setting consistent perimeter lighting levels, using LED fixtures with good color quality so faces, vehicles, and obstacles are easy to see. Fixtures are placed to remove dark corners near landscaping and dumpsters.
Accessible parking areas typically require focused maintenance every year, including routine inspections, annual crack sealing, and frequent re-striping to keep markings transparent and compliant. Property owners often budget between regular maintenance cycles depending on climate severity. Sealcoating every 2–5 years, conducting drainage checks, and promptly repairing potholes are essential for maintaining ADA compliance. Tasks such as large-scale sealcoating or line striping usually require specialized equipment and trained contractors to ensure compliance with accessibility standards.
Energy-efficient LED fixtures provide excellent lighting while meeting safety foot-candle requirements and reducing operating expenses. A color temperature of 3000–4000K improves visibility, reduces glare, and effectively limits light pollution. Full-cutoff, dark-sky-compliant fixtures control light spill to surrounding properties, while motion sensors and photocell controls dim lights during low-use periods, lowering costs without dropping below required safety standards. Properly designed lighting enhances security and helps users navigate safely at night.
Landscaping supports safety when designers prioritize clear sightlines and unblocked walkways. Careful placement guides plants away from ramps, crosswalks, and loading zones, preserving accessible routes throughout the lot. Use high-branching canopy trees in islands, keeping trunks outside travel paths and roots away from pavement edges to prevent damage. Shrubs should stay under three feet tall near drive aisles, with taller screening set back from corners and crossings to maintain driver visibility and pedestrian safety.
Winter snow and ice management protects accessible parking when crews clear spaces, access aisles, and routes first, keeping them open edge-to-edge. Staff should use effective deicing strategies with fine, non-abrasive materials that improve traction without blocking wheelchairs or creating hazards. Avoid piling snow in accessible areas, maintain proper drainage to reduce refreezing, and follow written response timelines to ensure people with disabilities can safely reach building entrances. Consider using calcium or magnesium chloride products instead of rock salt, as rock salt can damage concrete.
Parking policies should treat misuse as a clear violation and enforce consistently and visibly throughout the facility. Post simple, clear rules explaining permit requirements, check placards against identification when appropriate, and issue written warnings for first offenses. Implement steep fines for repeat violations to deter continued misuse. When drivers ignore rules or block access, swift towing is appropriate, with costs fully paid by offenders. Education signs explaining why these spaces matter help build public support for strict, fair enforcement that protects users who truly need accessible parking.
By planning accessible capacity correctly, designing clear access aisles with proper markings, and using compliant signage at the right height, property owners create parking lots that serve all users safely and meet legal requirements. When they maintain proper surfaces, gentle slopes, and predictable traffic flow, they reduce accidents, confusion, and liability exposure. Adding appropriate lighting, security features, and visible walkways further protects drivers and pedestrians while enhancing the property's professional appearance.
At TriStar Built, we understand that North Texas commercial parking lots must handle intense heat, expansive clay soils, and heavy traffic while meeting strict ADA accessibility standards. Our team has designed and constructed parking facilities throughout Denton County since 2006, bringing engineering expertise and attention to detail that ensures your lot performs safely for decades. Whether you're planning a new commercial parking area, renovating an existing lot to meet current accessibility codes, or need expert guidance on ADA compliance, we treat every project as if it were our own. Contact TriStar Built today to schedule a consultation and discover how proper design and construction create parking facilities that protect your business, serve all customers safely, and maintain their value for years to come.


Whether you’re remodeling a home, expanding a business, or starting from the ground up, TriStar Built is here to guide you every step of the way. With a focus on craftsmanship, communication, and results that last, we make the construction process clear, smooth, and worth every investment.

LOCATION: 2126 James Street, Denton, TX 76205
PHONE: (940) 381-2222
© 2025 TRISTAR BUILT - ALL RIGHTS RESERVED | WEB DESIGN & SEO BY: Authority Solutions®